Originally published at: Build an MQTT based RGB LED panel! // Project - MickMake - Live. Learn. Make.

This quick project shows you how to build an MQTT controlled RGB LED matrix panel in under 30 minutes, but I reckon it should take you a lot less. Continue reading Build an MQTT based RGB LED panel! // Project→
1 Like
Dear Mick,
Your RGB LED panel project is really impressive.
I hope I could try to make this MQTT controlled RGB LED MATRIX panel. But before that, I would like to ask you something.
There are some ways to use RGB LED panel.
A. Adafruit RGB Matrix HAT + RTC for Raspberry Pi
B. Raspberry PI zero + zero Pi HAT
C. Adafruit RGB LED matrix, teensy 2.0++, bluesmirf gold, 5v8a UBEC, 5000mah lipo battery (https://youtu.be/NUpaGlB6DAI)
How do you think which one is the best way to use what if I would like to make something to communicate with music, images, data, etc?
I knew that it is very complicated.
So I will give some examples.
Option1. I would like to send some images, text with smart phone application in a room about 1,000 square feet.
or
Option2. I would like to send images, text with my computer to RGB LED PANEL based on your MQTT project.
Please, give me your advice.
Thank you in advance!
Hopefully, help me to build this great project.
Best regards,
Clara
1 Like
Hey Clara,
The two ways you suggested are pretty much the only two ways. Communication via Bluetooth or WiFi.
Using a Teensy should be easy to implement, but the smartphone app would be a bit more difficult. There’s no reason why you couldn’t run MQTT on the Teensy as well, that’d simplify the setup.
If you wanted to change the display with music; ie show album cover, then it’d be easier with a Pi as the limited memory space of the Teensy would be a problem.
What did you want to display?
1 Like
Dear kind Mick,
I am so appreciated to your fast answer.
Actually, I would like to make some RGB LED display projects.
Project 1. Song list RGB LED display
Our worship team sing 4 songs every Sunday and sometimes we do 5 songs.
I would like to communicate with Song list RGB LED display
Project2. Short Cartoon Display like PEANUTS
Sometimes, whenever I feel nervous, I would like to watch short cartoon with LED display. Specifically , I love Charles Schulz’s and his philosophical dog Snoopy. Recently, I bought some books!
From the beginning, I will make your project one by one and then I will try to do and research my works.
Thank you for your magnificent project sharing always.
P.S/ And I like your humour :))
Have a wonderful day.
Best regards,
Clara
3 Likes
Hi Clara,
In that case I would use a Pi Zero. I’m gathering that you have someone up the back who manages the lyrics for the congregation? They could also control the LED panel and update the song title.
3 Likes
It’s conceivable, in this scenario, that the panels might be fixed in place, so ethernet (i.e. copper) wiring might also be used (with a suitable Pi).
This might even be a more desirable solution in this environment as Wi-Fi & Bluetooth devices can suffer much more from interference than a wired solution. (Don’t forget that several people in the congregation may, unwittingly, leave there phones turned on as hotspots which can then cause some interference)
1 Like
Dear Mick,
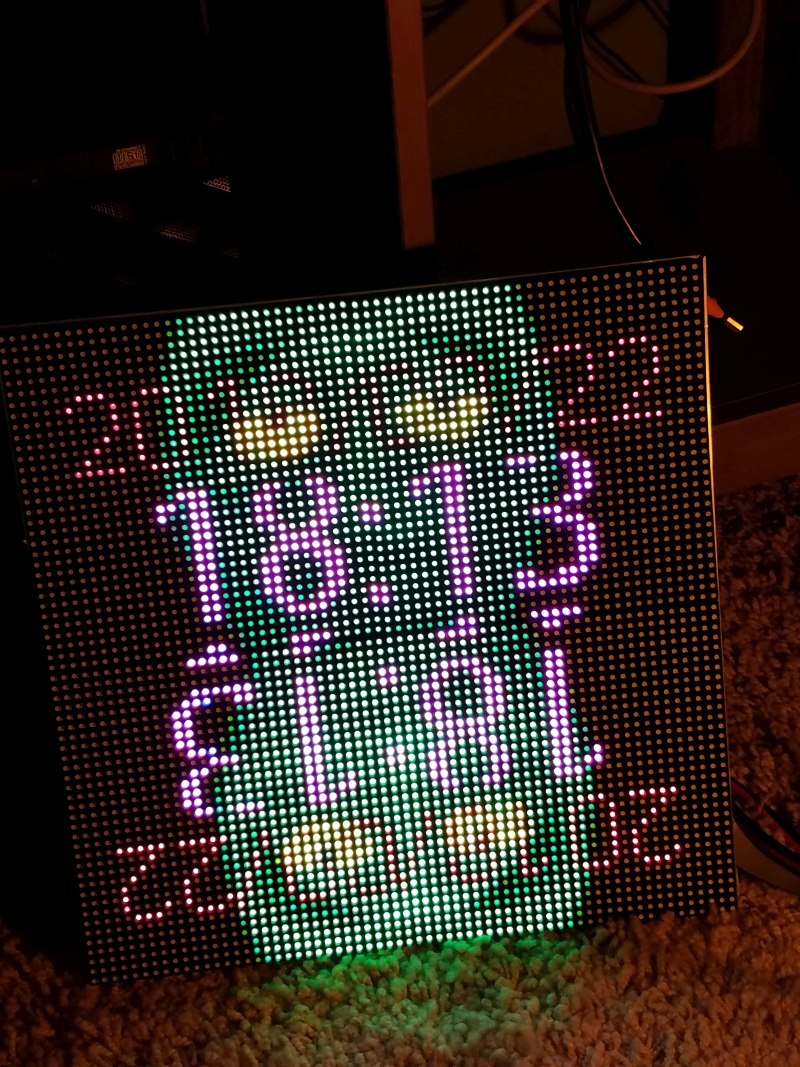
It has been a long journey to me. But today, I have seen a light of my life. Because, I could see red light in my LED RGB PANEL! Though it was kept on lighting only for 10 seconds and then it disappeared.
I chose Raspberry pie 3 instead of zero.
Now I am checking what is the problem.
Most of all, I think that I have finished my first Raspberry coding successfully until now. I installed programs from Rasbian to vim by myself and followed up your whole manual one by one. Sometimes, I made some mistakes back and forth. But finally, I did it. And also, I did my best to solder to make it perfect.
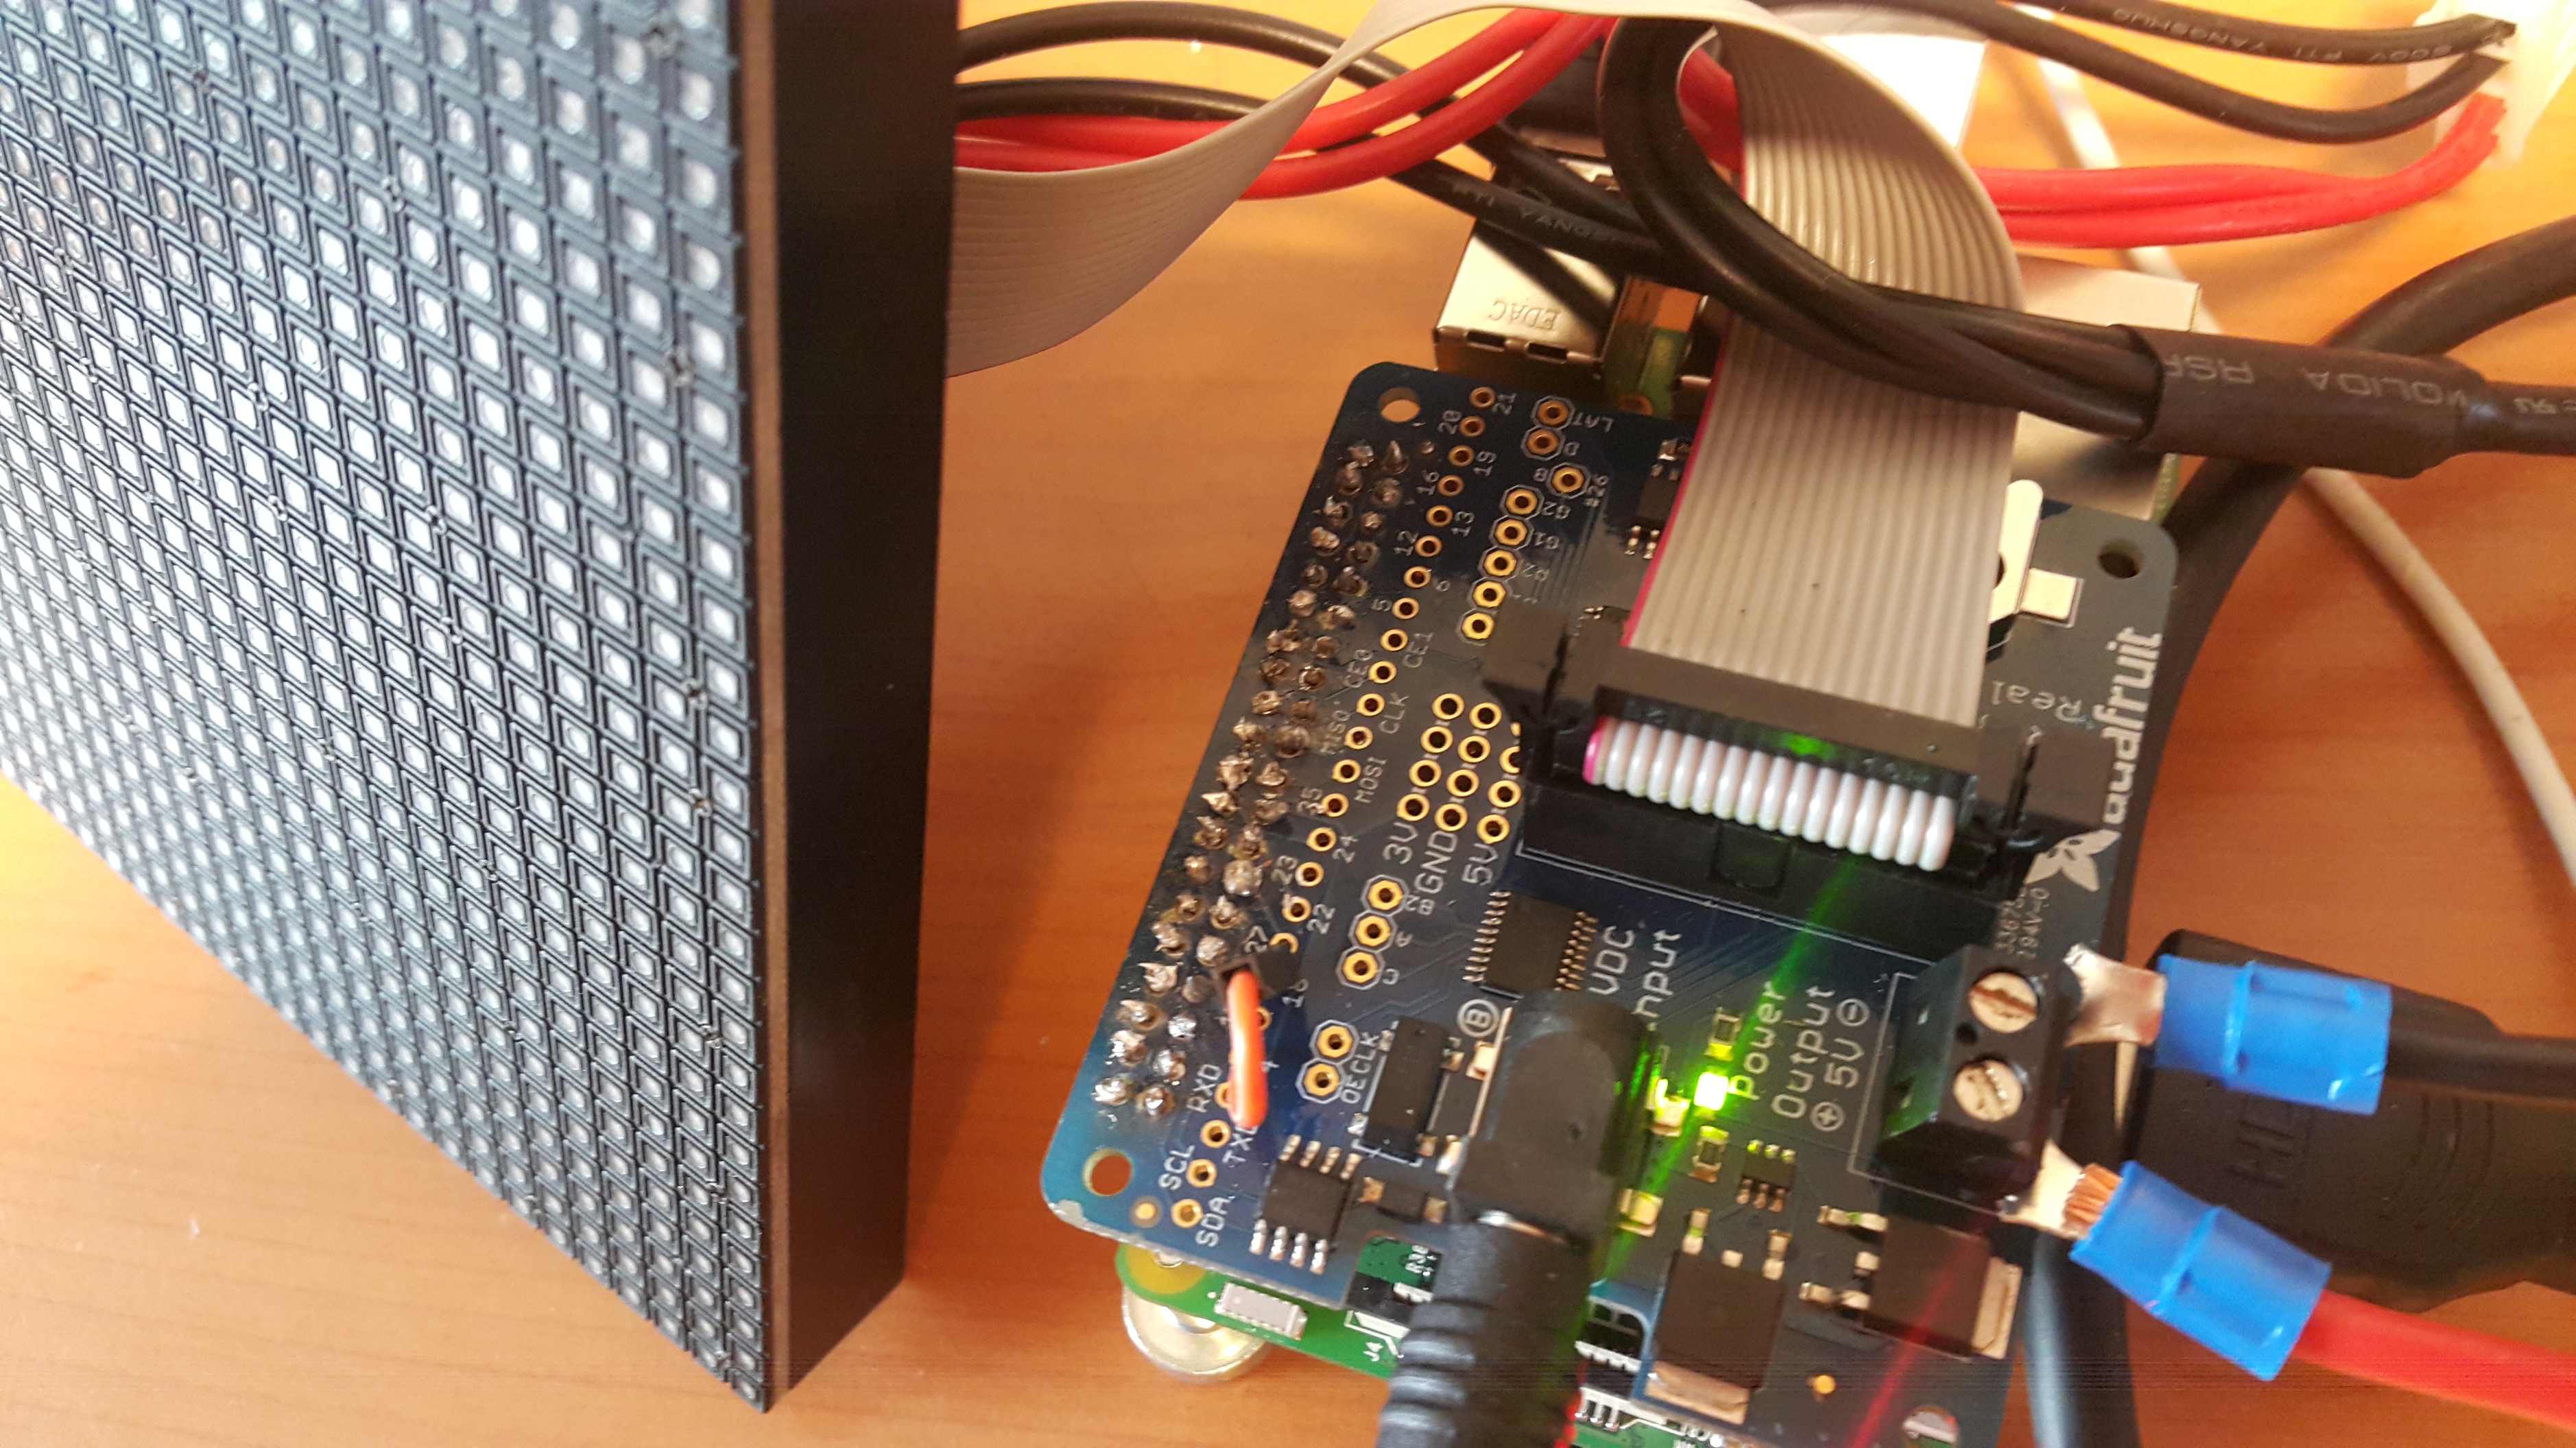
I soldered 40 GPIO pins, cable socket and connected GPIO 4 to 18 ,too.
Hopefully, I could see the light tonight in my LED RGB PANEL.
With warmest regards,
Clara Kim
1 Like
Hi Clara,
Great to see!
It can be a bit of a learning curve, but you’ll get there. Would be great to see it running once you get it all installed.
Mick.
1 Like
Finally , it is getting started to work!
Thank you, Mick!
Now I will try to do more right now.
With warmest regards,
Clara
1 Like
Nice to hear! Looks like you’ve got past all the hard bits.
Dear Mick,
Thanks for your cheerful message.
I was really happy to get it!
By the way,
I would like to change the image.
How can I do that?
And now, in my LED panel, only the part of the blue guy and the clock is lightening. What do I have the change for it? I thnk that the resolution is different from Raspberry pie3 and zero.
I am keeping watching on your youtube.
Those are really Great Projects!
Sincerely
Clara
1 Like
Thanks Mick, I got the MQTT Panel running on a RPi3 using the Adafruit Hat and four 32x32 panels. I really like this project for it’s potential–but learning docker, containers and MQTT on the fly is a challange. Can you reveal the modification needed to run the application with four (4) 32x32 RGB LED panels chained together?
Mick,
I came across this project while trying to hack together exactly the same thing in Python. I use Home Assistant and wanted a way to use MQTT to to display messages around the house.
After playing with this for about 30 seconds I abandoned my plans to make my own because this is a fantastic project. Thank you very much for making it. The gifs are an added bonus that I hadn’t thought of!
I wanted to ask if you’re accepting bugs. I’m not a C person so I don’t want to start hacking around in your code!
The bug is that this sequence
mosquitto_pub -h 127.0.0.1 -t /display/date/format -m '%a %d %b'
mosquitto_pub -h 127.0.0.1 -t /display/text/format -m '10°C'
for some reason causes the 10°C to appear where the date is AND in the text location. If I then publish another date/format it goes to what I’d expect to see.
Bug 2 - probably more of a request - could you make the container time zone aware? I had to start the container with
-v /etc/timezone:/etc/timezone -v /etc/localtime:/etc/localtime:ro
-e "SET_CONTAINER_TIMEZONE=true" -e "CONTAINER_TIMEZONE=Europe/London"
before it would display the time-zone adjusted time rather than UTC time.
Once again - thanks for making this. You’ve saved me at least a few weekends of doing my own coding and experimenting!
Steve
2 Likes
Mick, My time zone was off also. The reading in Pacific coast of the US was off by two hours unless it’s UTC or something–not the correct time in New South Wales either. The hat has the embedded DS1307 Real Time Clock so it would be cool to get super accurate–like a studio clock accurate for my application.
1 Like
Dear Mick,
I spent a little time trouble shooting while attempting to “make build” Project-MQTTpanel from the github source for (4) 32x32 panels. As a newbie on the rpi, I get a compile time error and observed that the Dockerfile has a configuration “cd /root/rpi-rgb-led-matrix” thinking this was the source of the error. What files or settings are needed to get past this error? Could you look at the output and suggest what is going on with the “make build” error i received?
Sincerely, M
Hi stetho,
Thanks for that!
I’m actually going to rewrite the whole thing in GoLang. So good to get bugs in the current code that I can address.
1 Like
Hello, I’m very interested in this project and I have ordered all the needed parts to do it. In case of using an Adafruit bonnet, I’ve seen that for 64x64 matrix panels you need to connect in the lower side of the bonnet a couple of points (8 or 16) with a solder blob, but I have not seen this on your instructions. Could you please confirm if this is needed or not?
Thanks a lot and best regards / Fernando
1 Like
Hey Mick how are you doing
hope the storm did not do to mutch damage to your house
quick quetion how did you manage to run the clock text and the background image in one go using the rpi-rgb-matrix library
and it it possible to run your code without docker
and if so how tried running and compiling it but no luck so far
1 Like
Essentially, I’m drawing each layer on top of each other. That is: start from the lower layer and draw up. So, no sprites or any fancy graphics primitives.
It is possible to run it without Docker. Once I get a bit of bandwidth I want to revisit this project and rewrite it in GoLang. This will reduce the amount of complexity and enable a single executable to run.
Of course you could still run it in Docker as well. Either way.
If you look at the Dockerfile on GitHub it has all the build method contained within a script. You’ll just have to be careful about paths.
Hi Mike, thanks for sharing this awesome little project!
However currently the installation of Docker on the pi0 is not working. Follow the instructions in this thread: https://github.com/moby/moby/issues/38175#issuecomment-439733278 to fix the install.
Cheers
Steven
1 Like